
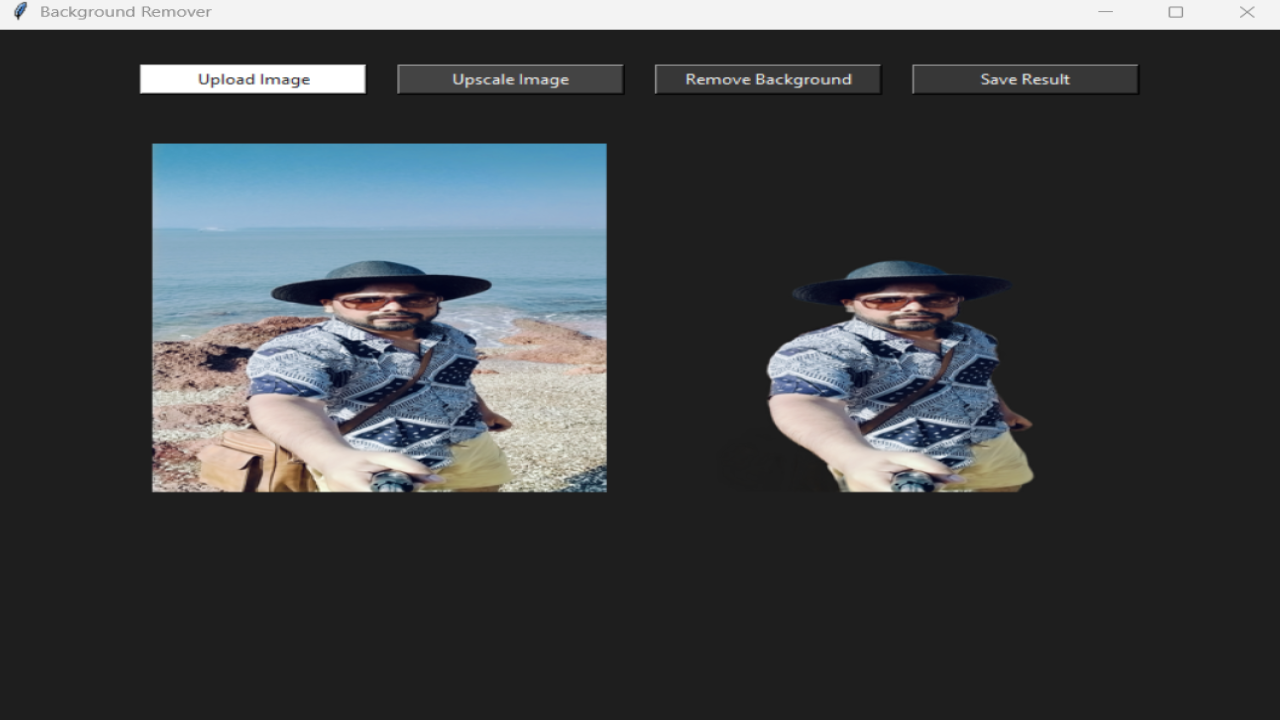
Project Description
Python Desktop App for Image Upscaling and Background Removal: A Complete Guide
Introduction
In this tutorial, you'll learn how to build a Python desktop application that allows users to upscale images and remove their backgrounds with ease. The app features a clean graphical user interface (GUI) built with Tkinter, uses rembg for AI-powered background removal, and Pillow for image processing.
This project is perfect for anyone interested in image editing tools, Python GUI programming, or AI-assisted photo manipulation.
Why Build an Image Upscaling and Background Removal App?
Image editing is an essential part of graphic design, photography, and content creation. Often, you need to improve image resolution or isolate subjects by removing backgrounds. Automating this process saves time and offers a user-friendly way for non-experts to enhance images.
By combining Python, Tkinter, rembg, and Pillow, you can create a lightweight desktop app that accomplishes these tasks locally — no internet connection required.
Prerequisites
Before you start, make sure you have:
- Python 3.7 or higher installed on your system
- Basic understanding of Python programming
- Familiarity with command-line tools (terminal or PowerShell)
Step 1: Setting Up Your Python Environment
Start by creating a clean workspace with a virtual environment to manage dependencies:
1. python -m venv venv
Activate the virtual environment:
- On Windows:
venv\Scripts\activate
- On macOS/Linux:
source venv/bin/activate
Step 2: Installing Required Libraries
Install the essential Python libraries using pip:
pip install rembg pillow pyinstaller
- rembg: An AI tool to remove image backgrounds.
- Pillow: A powerful imaging library for Python.
- PyInstaller: For creating standalone executables.
Freeze your dependencies for future reference:
pip freeze > requirements.txt
Step 3: Building the GUI with Tkinter
Create a file named main.py. Using Tkinter, build a simple window with buttons for:
- Uploading images
- Upscaling the image
- Removing the background
- Saving the final result
Key elements include:
- Two image panels to show the original and processed images side by side.
- Buttons disabled/enabled based on user actions for better UX.
-
Step 4: Implementing Image Upload and Display
Allow users to select an image from their system using a file dialog:
file_path = filedialog.askopenfilename(filetypes=[("Image files", "*.png *.jpg *.jpeg")])
Display the uploaded image resized to a consistent preview size, for example, 300x300 pixels.
Step 5: Adding Image Upscaling Feature
Use Pillow's resize() method with the LANCZOS filter to double the image resolution:
self.original_image = self.original_image.resize((width * 2, height * 2), Image.LANCZOS)
Updating the preview allows users to see the effect before background removal.
Step 6: Removing the Background
Utilize rembg to process the uploaded (and optionally upscaled) image:
buffered = io.BytesIO()
self.original_image.save(buffered, format="PNG")
result = remove(buffered.getvalue())
self.result_image = Image.open(io.BytesIO(result)).convert("RGBA")
Display the processed image in the result panel.
Step 7: Saving the Result Image
Provide an option to save the background-removed image as a PNG file:
file_path = filedialog.asksaveasfilename(defaultextension=".png", filetypes=[("PNG files", "*.png")])
if file_path:
self.result_image.save(file_path)
Show a success message upon saving.
Step 8: Packaging Your App as an Executable
To distribute your app easily, create a standalone executable using PyInstaller:
pyinstaller --noconsole --onefile main.py
Find your executable inside the dist folder, ready to run on systems without Python installed.
Conclusion
You’ve built a powerful Python desktop app for image upscaling and background removal with a sleek GUI. This project is a great stepping stone toward more advanced image processing and GUI development.
Feel free to expand it with features like drag-and-drop image placement, adjustable upscale factors, or batch processing!
Keywords
- Python image upscaling
- Background removal app
- Tkinter image editor
- AI background removal Python
- Python desktop GUI app
- rembg tutorial
- Pillow
image processing
Source Code
import tkinter as tk
from tkinter import filedialog, messagebox
from PIL import Image, ImageTk
from rembg import remove
import io
class BackgroundRemoverApp:
def __init__(self, root):
self.root = root
self.root.title("Background Remover")
self.root.geometry("850x600")
self.root.configure(bg="#1e1e1e") # Set window background to black
# Frame for buttons at the top
btn_frame = tk.Frame(root, bg="#1e1e1e")
btn_frame.pack(pady=30)
button_width = 20 # Width in characters
self.upload_btn = tk.Button(btn_frame, text="Upload Image", command=self.upload_image,
bg="#FFFFFF", fg="#222222", width=button_width)
self.upload_btn.grid(row=0, column=0, padx=10)
self.upscale_btn = tk.Button(btn_frame, text="Upscale Image", command=self.upscale_image,
state=tk.DISABLED, bg="#444444", fg="#F5F5F5", width=button_width)
self.upscale_btn.grid(row=0, column=1, padx=10)
self.remove_btn = tk.Button(btn_frame, text="Remove Background", command=self.remove_bg,
state=tk.DISABLED, bg="#373737", fg="#F5F5F5", width=button_width)
self.remove_btn.grid(row=0, column=2, padx=10)
self.save_btn = tk.Button(btn_frame, text="Save Result", command=self.save_image,
state=tk.DISABLED, bg="#373737", fg="#F5F5F5", width=button_width)
self.save_btn.grid(row=0, column=3, padx=10)
# Frame for image display (centered below buttons)
image_frame = tk.Frame(root, bg="#1e1e1e")
image_frame.pack(pady=10)
self.image_panel = tk.Label(image_frame, bg="#1e1e1e")
self.image_panel.grid(row=0, column=0, padx=20)
self.result_panel = tk.Label(image_frame, bg="#1e1e1e")
self.result_panel.grid(row=0, column=1, padx=20)
self.original_image = None
self.result_image = None
def upload_image(self):
file_path = filedialog.askopenfilename(filetypes=[("Image files", "*.png *.jpg *.jpeg")])
if file_path:
self.original_image = Image.open(file_path).convert("RGBA")
img = self.original_image.resize((300, 300))
img_tk = ImageTk.PhotoImage(img)
self.image_panel.configure(image=img_tk)
self.image_panel.image = img_tk
# Clear previous result image and disable save button
self.result_panel.configure(image='')
self.result_panel.image = None
self.save_btn.config(state=tk.DISABLED)
self.result_image = None
self.remove_btn.config(state=tk.NORMAL)
self.upscale_btn.config(state=tk.NORMAL)
def upscale_image(self):
if self.original_image:
width, height = self.original_image.size
new_size = (width * 2, height * 2)
self.original_image = self.original_image.resize(new_size, Image.LANCZOS)
img = self.original_image.resize((300, 300)) # Resize preview for display
img_tk = ImageTk.PhotoImage(img)
self.image_panel.configure(image=img_tk)
self.image_panel.image = img_tk
messagebox.showinfo("Upscaled", "Image upscaled successfully!")
def remove_bg(self):
if self.original_image:
buffered = io.BytesIO()
self.original_image.save(buffered, format="PNG")
result = remove(buffered.getvalue())
self.result_image = Image.open(io.BytesIO(result)).convert("RGBA")
img = self.result_image.resize((300, 300))
img_tk = ImageTk.PhotoImage(img)
self.result_panel.configure(image=img_tk)
self.result_panel.image = img_tk
self.save_btn.config(state=tk.NORMAL)
def save_image(self):
if self.result_image:
file_path = filedialog.asksaveasfilename(defaultextension=".png",
filetypes=[("PNG files", "*.png")])
if file_path:
self.result_image.save(file_path)
messagebox.showinfo("Saved", "Image saved successfully!")
if __name__ == "__main__":
root = tk.Tk()
app = BackgroundRemoverApp(root)
root.mainloop()